Red Green
from the infamous Canadian PBS series The Red Green Show would be proud of my
star tracker. On his program he builds all kinds of workable…sort
of…contraptions using not much more than junk spare parts and duct tape. My
star tracker certainly looks like something along that line. Amazingly, it
works better than I could have imagined.
About a year
ago after watching some amazing videos of the night sky and gazing upon some
magnificent still images of the Milky Way. I began to wonder how the
photographers managed to capture such fantastic images. What little night sky
photography I had tried resulted in barely more than capturing a few dozen
points of light against a dark background. Nothing spectacular about that. But,
I was intrigued and started to research how to build what was called a Barn
Door Star Tracker.
The concept
of how they worked seemed simple enough. Their operation is based on being able
to pivot the camera at the right latitude angle, at the same rate the star fields
rotate across the sky.It requires a hinged platform that allows for pointing
the camera in any direction, and a drive shaft, made from a ¼ inch 20 carriage
threaded bolt placed at a specified distance from the hinge to allow for the
proper degree of rotation at one full revolution per minute. The next weekend
after some trial and error I managed to create a working model that manually
tracked the night sky and began to experiment in capturing what I hoped would
become amazing images of the Milky Way. Initial results were encouraging yet
not quite what I was hoping for. The prototype proved a bit cumbersome to use
and align with the pole star. The alignment part I was to discover was the key
to its operation. Improperly align the devise and the tracking would be way
off. I do not have the space for an indepth discussion on how to align the tracker, but there are plenty of websites that cover this information.
Eventually,
I rebuilt the contraption and mounted it on an old telescope tripod that had
been sitting in the attic for several years. This new production model proved
much more capable and easier to operate and through the summer, my technique
also improved along with my knowledge about the night sky. That knowledge
proved vital in being able to identify potential subject matter.
The trick to
making it work correctly is, as mentioned previously, proper alignment along
with smooth tracking by hand. The tracking part using a wide angle lens is
relatively simple; ¼ turn of the drive shaft handle every 15 seconds will allow
you to take exposures upwards to several minutes long with good results.

The exposure
setting on your camera is simple. The tracker should be secured to a heavy duty solid tripod to reduce vibrations. Set the camera to Manual exposure and manual focus. I usually shoot in JPEG, but RAW would be better if you know how to process that kind of image. Select the BULB setting for the shutter. ISO setting should probably begin at 800, but 1600 and 3200 with most cameras will work with very little noise issues. A point to remember is that an ISO setting of 1600 will require half the exposure time to obtain the equivalent exposure value when set at 800. So a two minute exposure at 1600 is the equivalent of a 4 minute exposure at 800. You will see more noise at 1600 or 3200, but most of that can be cleaned up in post processing. I’ve shot upwards to 6400 without too much noise problems, but they did require some cleaning.
Open the aperture all
the way open (f/2.8, f/3.5…ect). Use a cable release and some kind of timer
(stop watch, or just count to yourself) so you can determine the exposure
length. Set the focus to infinity (some lenses have an infinity setting offset
slightly from the infinity mark) Press the remote shutter release and hold
and rotate the drive shaft at the 1rpm interval rate until you reach your determined exposure time and release…it’s that simple. You
can adjust the time as needed to obtain different results. Oddly enough, using a wide angle lens, anything upwards to 30 seconds and you do not need to track the sky. The star trailing is so insignificant and the stars themselves are so small, the stars retain their sharp pin point appearance. Over 30 seconds and the stars will begin to show signs of trails if not tracked.
I’ve been
able to go as long as seven minutes but most exposures from one to three
minutes are more typical. When you use a longer focal length lens, then the
manual tracking becomes more cumbersome. Up to about a 40mm lens, you can stick
with the ¼ turn every 15 seconds equation. Using a 50mm upwards to 80mm lens
and you will need to increase the rate to something like 1/8 of a turn every 7
to 8 seconds…roughly two times as often to obtain the 1 revolution/minute rate.
Push the lens out longer than 80mm and you will need to manually turn the drive
shaft pretty much continuously. That can be difficult to do without causing
vibrations in the tracker that result in blurred images.
One of the
easiest ways to get around that is to employ an electric motor to turn the
drive shaft. Now, I’ve read numerous articles and thumbed through countless
diagrams for how to do this using stepper motors with gears and electronic
devises that control the motor voltage. That is all fine and good if you are an
electronic wiz-kid and mechanical engineer. Some of these contraptions can end
up costing hundreds of dollars. Thing is, you don’t have to do that. Let me explain.
 The idea
behind employing an electric motor drive is to generate a continuous rotation
of the drive shaft to make the tracker follow the rotation of the sky precisely
without having to do it by hand. This allows you to use longer focal length lenses
so you can capture deep sky objects at least reasonably well.
The idea
behind employing an electric motor drive is to generate a continuous rotation
of the drive shaft to make the tracker follow the rotation of the sky precisely
without having to do it by hand. This allows you to use longer focal length lenses
so you can capture deep sky objects at least reasonably well.
In comes Red
Green again. Think about it. What happens when you manually rotate the drive shaft? You use your finger to gently turn the handle ¼ turn
every 15 seconds to rotate the shaft 1 full turn every 60 seconds. So, the
logical thing would be to replace your finger by using a 6 to 12volt 1 rpm
electric motor. A little research resulted in finding such a motor on the
ServoCity website for about $25.00.
Using a
little Red Green ingenuity, I attached the motor using a wooden extension and
replaced my finger by using a short piece of coat hanger bent into an elongated
Z. I attached the hanger wire to the motor using a short piece of plastic
tubing…aligned the motor drive as closely as I could to the tracker drive
shaft. Then using two 6v flashlight batteries wired to create 12v, I connected
the motor and power source using copper wire and alligator clips. The first
test run that night proved the reliability and accuracy of the contraption.
Oddly enough, this is not rocket science…just requires some simple
understanding of the principle involved.
You can of
course use a 2 rpm motor attached thru a rheostat of some type to control the
voltage so you can fine turn the motor timing. The one I created tended to run
a little slower than 1 rpm especially when using a heavy 50-500mm lens, but it
still had plenty of torque to turn the drive and was accurate enough to capture
an image reasonably well.
 |
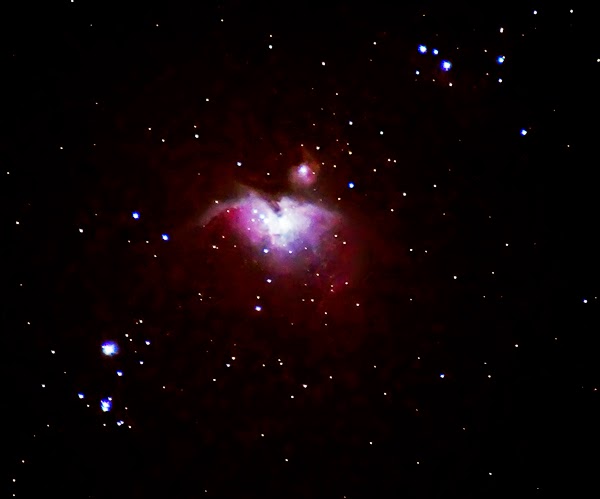
| Orion Nebula Photographed using Motorized Star Tracker |
The main
problem I had using the heavy lens was to keep the alignment accurate. By
rotating the lens in one direction and then to another, the weight of the lens
caused the tracker to warp slightly, just enough to throw off the alignment. So
with each repositioning of the lens, I had to realign the tracker to ensure
proper tracking.
Designs of a
Barndoor Tracker (also called a Scotch Mount) are varied and creative. They all
work on the same principle and some are more complex than others. You can search on the internet for barndoor
trackers and find all kinds of designs and plans. I’ve listed a few below. They
are relatively simple to build, pretty easy to use, and open us a whole new
world of photography.
Keith